Blogs

Explore blogs about photo printers topics for the latest tech, creative ideas, and printing tips. Elevate your printing experience and capture moments.

Explore by Topic

Sticker Printer vs Cutting Machine: Which One Do You Need?

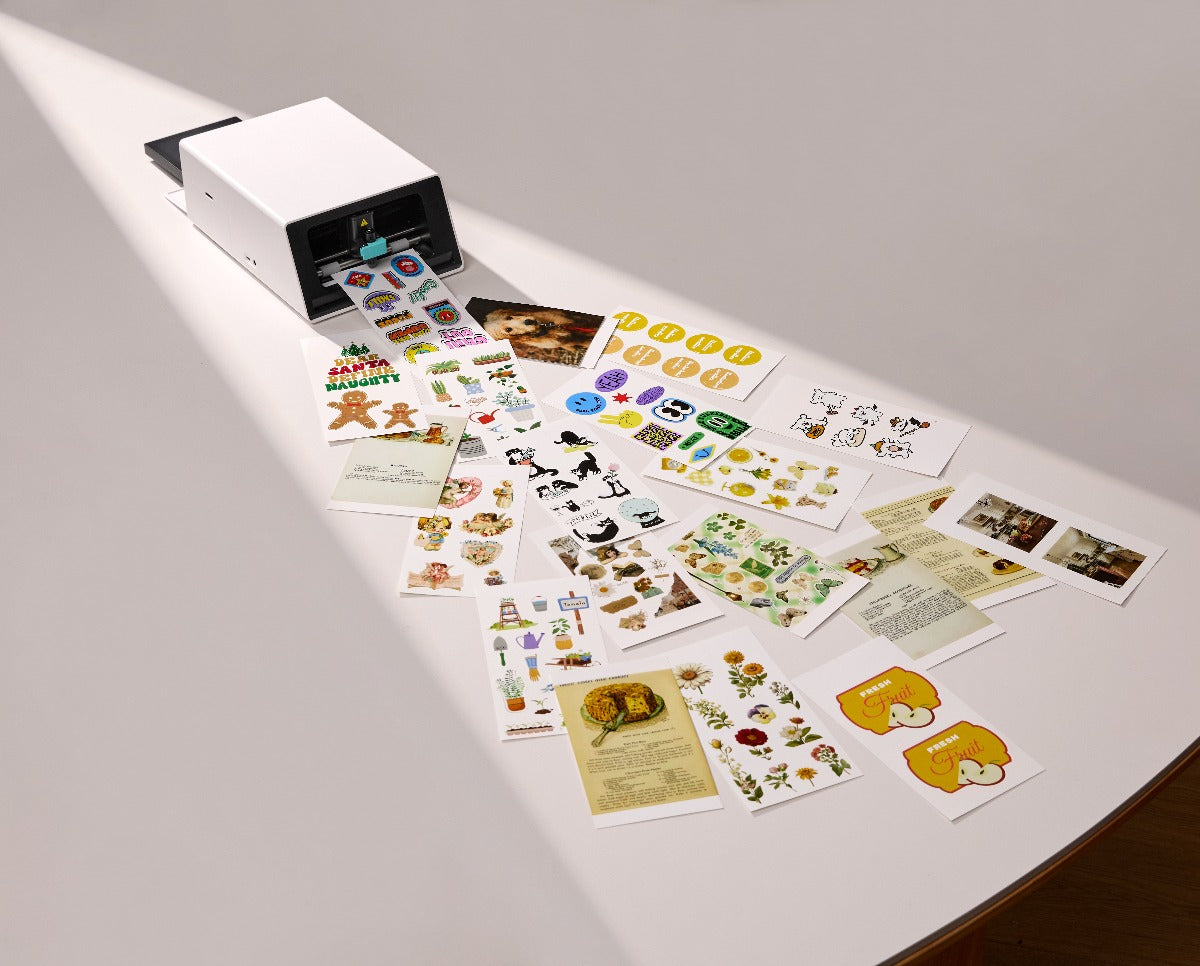
Making stickers at home used to take more machines than it should. A sticker printer prints your design and cuts it out in one pass. A cutting machine only cuts, so it needs a printer working beside it. For years that was the only way to do it, and it meant two machines and seven steps: Print the sheet on an inkjet. Wait for the ink to dry. Line it up on a cutting mat. Load the mat. Let the sensor hunt for the registration marks. Weed the offcuts. Laminate the stickers, if you want them to survive a water bottle. An all-in-one sticker printer and cutter does the same job in three: design, print, peel. It has been on sale for 700 days now, which is long enough to know whether that actually holds up. Below: what each setup really costs, where a cutting machine still wins, and how the one-machine version has held up  Every sheet on this table came out of the one machine at the top of it. What a Cutting Machine Does (and What It Doesn't) This is the root of it, and it catches people out constantly. A cutting machine is a plotter with a blade in it. You give it a shape and it cuts that shape out of whatever you've loaded: vinyl, cardstock, iron-on, sticker paper. There is no ink inside it. Cricut's entry and mid-range machines run from the Joy 2 at $99 to the Explore 5 at $199. Silhouette and xTool sell comparable machines. None of them can put color on a page. So the color has to come from somewhere else, and that second machine is where the work multiplies. You still need a printer, and here's how print-then-cut works Every cutting machine solves this the same way, by borrowing a printer you already own. Cricut calls the feature Print Then Cut, Silhouette calls it Print & Cut, and both work like this: the software surrounds your design with black registration marks, you print the sheet on your own inkjet, you stick it to a cutting mat, and an optical sensor hunts for those marks to work out where the design landed before the blade moves. It works. Once calibrated, it's reliable. But the machine is guessing at something it never saw printed, and that guess is sensitive to room lighting, paper color, and how square you got the sheet on the mat. When it drifts, you get a sliver of white down one edge and a sheet in the bin. There's a size cost too. On a Cricut, the usable Print Then Cut area on US Letter is 7.44" × 9.94". The rest of the page belongs to the registration marks.o What the two-machine setup actually costs Most people budget for the cutting machine and stop there. It's usually the smallest number in the stack. The cutting machine. $99 to $199 for a current entry or mid-range model. An inkjet printer. $60 to $200 if you don't already own one. Ink. The line nobody budgets for. Sticker designs are full-bleed color at photo quality, which is the most ink-hungry thing a home printer does. A sheet of stickers is not a sheet of text. Printable sticker paper. A 50-sheet US Letter pack runs about $24 to $30, so roughly $0.48 to $0.60 a sheet. Inkjet only, always. Laser heat melts the adhesive. Mats and blades. Mats lose their grip after a few dozen loads. Blades dull. Laminate sheets, if you want stickers that survive being handled. A cutting machine is a good buy if you'll cut more than stickers with it. It's a platform. But if stickers are the whole reason you're shopping, you're paying for a lot of capability you'll never load, and running a seven-step process to get one sheet. What an All-in-One Sticker Printer Does An all-in-one sticker printer and cutter collapses the whole chain into a single paper path. The sheet is printed, laminated and cut without ever leaving the machine, which means there is nothing to align, because nothing was ever moved. Seven steps become three: design, print, peel.   Two machines All-in-one sticker printer Steps to a finished sticker 7 3 Devices Printer + cutter + laptop 1 Alignment Registration marks and an optical sensor None Ink Cartridges or tanks, ongoing None Lamination Separate step, separate sheets Automatic, on the same pass Print and cut in one pass, with no alignment step The  Liene PixCut S1 prints at 300 DPI using thermal dye-sublimation with a 1280-dot thermal print head then runs an AI pass that lifts your subject off its background and hands the blade an outline to follow, accurate to ±0.5 mm. Because the printing and the cutting happen inside the same machine on the same sheet, there are no registration marks and no calibration. The machine already knows where the ink went. A four-layer protective laminate goes on automatically as each sheet prints, so stickers come off already sealed. That's the step you'd otherwise be doing by hand with laminate sheets. It connects over Bluetooth 5.0 and pairs with up to three devices at once. The Liene Photo app runs on iOS and Android phones and tablets, so you can lay a sheet out on a tablet's bigger screen and send it straight to the machine.  Send the design from your phone. Print, laminate and cut happen without another step from you. How the PixCut S1 does it The Liene PixCut S1 prints at 300 DPI using thermal dye-sublimation with a 1280-dot thermal print head, laying down 16.7 million colors in continuous tone. No dots, no banding. The app finds your subject, lifts it off its background, and hands the blade an exact outline to follow. Cuts land within ±0.5 mm. Because the print head and the blade share one paper path, the machine already knows where the ink went, so there is no registration step to get wrong. A four-layer protective laminate goes on automatically as each sheet prints. That's the step you'd otherwise be doing by hand, and it's what makes the stickers water-resistant, scratch-resistant and slow to fade.  The sheet comes out printed, sealed and cut to the outline, with nothing to line up. It pairs with up to three devices over Bluetooth 5.0, and the app runs on iOS, Android, iPad, Android tablets, Windows and Mac, so you can lay a sheet out on a big screen and send it without moving files to your phone first. No ink, and what a sticker costs Dye-sublimation means there's no ink to buy, dry out, or clog. Color comes from the ribbon inside the paper refill, so paper and color arrive as one purchase, and a full-bleed sheet costs exactly the same as a sparse one. Refills are $42.99 for 72 4×7" sticker sheets, about $0.60 a sheet, or roughly $0.20 a sticker once you've filled the page.  Paper and colour arrive in the same refill, so there is nothing else to buy.  For anyone selling stickers online, the comparison that matters isn't two machines but making versus ordering. A PixCut sheet costs $0.60 whether you print one or a thousand, while print services price in tiers: around $2 a sheet at 50, falling toward $0.60 only as you approach a couple of thousand. Order size Print service PixCut S1 consumables You save 50 sheets ~$101 $29.85 70% 100 sheets ~$153 $59.71 61% 500 sheets ~$438 $298.54 32% 700 days of people actually using one The all-in-one isn't a concept. The PixCut S1 has been shipping for 700 days. That matters more than a spec sheet. The two-machine workflow is a known quantity: people have run it for fifteen years and every failure mode is written down somewhere. A single paper path shared by a print head and a blade only earns trust by running for a long time, in a lot of different rooms, on a lot of different designs. Reviewing it for Tested, Norm from Adam Savage's Tested youtube channel called it the first device of its kind he'd seen in this market, and what caught his eye was the step that isn't there: "No need to take a printed sticker sheet, align it, register it on some type of vinyl cutter and then cut them out. Does it all at once." TechRadar scored it 4.5 out of 5. Frequently Asked Questions Do I need a cutting machine to make stickers? No. A cutting machine can't print, so on its own it can't produce a printed sticker at all. It needs a printer feeding it. An all-in-one sticker printer does both jobs in one device, with no separate printer required. Can a sticker printer cut shapes? The PixCut S1 lifts your subject off its background automatically and cuts the outline to within ±0.5 mm. A plain photo printer can't. It only prints, and you'd be cutting by hand or feeding the sheet to a separate cutter. What's the cheapest way to make stickers at home? If you already own a color inkjet, printable sticker paper and a pair of scissors is the cheapest start, at roughly $0.50 a sheet with no new hardware. It's slow, and the edges show it. The cheapest setup that produces stickers you'd actually sell or give away is an all-in-one at around $300 with no ink to replace. The most expensive route is the one people don't see coming: a cutting machine plus a new printer plus ink, mats, and blades. Is it cheaper to print stickers myself or order them? Below a couple of thousand sheets per order, printing them yourself is cheaper per sheet, and the machine pays for itself in roughly 66 sheets at typical selling prices. Above that, volume discounts make ordering cheaper. The other half of the answer is inventory: printing yourself means no minimum order and nothing sitting unsold. Is a sticker printer the same thing as a sticker machine? "Sticker machine" gets used for both categories, which is where most of the confusion starts. Before you buy anything, check one thing on the product page. Does it print in color, or does it only cut? Can I use a laser printer to make stickers? No. Printable sticker paper is made for inkjet printers. A laser printer fuses toner with heat, which can melt the adhesive and the backing, damaging the sheet and sometimes the printer with it. Sticker paper brands carry this warning on the pack. Want to skip the two-device setup? The Liene PixCut S1 prints and cuts in one pass, with no ink, no mats, and no subscription. Have a look at 20 ways people are using theirs, or read how to turn any image into a sticker.

700 Days Later: Is the PixCut S1 Still the Sticker Printer to Buy?

  Day one, and 700 days later. Two years of real use behind it. Search "sticker printer" and you'll get a page of machines. A lot of them can't print. That isn't a typo. A Cricut has no ink in it. Neither does a Silhouette, or a Brother ScanNCut. They cut shapes out of sheets you printed somewhere else. Go the other way and a Canon IVY or a Kodak Step will print a sticky-backed photo but can't cut a shape out of it. The Liene PixCut S1 does both, and it got there first. It has been on sale for 700 days now, long enough that the question isn't whether the idea works, but what it looks like after two years on real desks. That makes it an unusual thing to shop for. Normally you'd wait: a rival lands, prices drop, version two fixes version one. Here the machine that opened the category is also the one with the longest track record, so the question worth asking is how it has held up. A first-week review can't answer that. Two years of sheets can. What 700 days proves The jar labels and the kids' sticker sheets come off the same machine. A printer and a cutting machine working side by side is a known quantity. People have run that setup for fifteen years. An all-in-one is a different proposition. The PixCut S1 puts a print head and a blade on the same paper path, so a sheet is printed, laminated and cut without ever being unloaded. On paper that removes the alignment step entirely. What a spec sheet can't tell you is whether that holds up after a thousand sheets, in a warm room, with a blade that's done some work. Labels for the business, stickers for the fridge, photos in the album. That's what 700 days answers and a launch review can't. Every unit is tested for print, cut and connectivity before it ships, and the machine is rated for 5,000+ continuous prints. But the evidence that matters most is the sheets run by people who weren't treating it as a demo product, on desks nobody controlled, for the last two years. Still the only one of its kind Five things in one machine and two years of real creators using it. Reviewing the S1 for Tested, Norm Chan called it the first device of its kind he'd seen in the prosumer market, and ended by asking for company: "It just makes a lot of sense to have both the printing and the cutting in one device. I want to see more of these machines out there by different manufacturers." Two years later, Liene is still the one shipping it. Two years of customer feedback have gone back into the paper, the app and the template library Cricut launched two new machines in February 2026. Both are excellent cutters. Neither has ink in it, and both still need a printer you supply. Brother's ScanNCut scans and cuts but doesn't print. Canon's IVY and Kodak's Step print sticky-backed photos but can't cut a contour. Open any current "best sticker printer and cutter" roundup and the all-in-one column still points back to one product family. That changes how the buying decision works. Normally, waiting is the smart move: a competitor arrives, prices settle, the second generation improves on the first. Here the head start is the point: the S1 has spent those two years being used, and there's no shortcut to that. What people are making with it Make stickers of anything, all on one machine. The clearest picture of a machine at 700 days comes from what people do with it once the novelty wears off. Journalers use it hardest. Reading journals, memory spreads, planner layouts. The pattern is always the same: you need one specific sticker, in one specific style, and it either doesn't exist for sale or it costs more and takes longer to ship than the project is worth. Making it yourself removes the problem entirely. Creative journal maker Erin Smith built an entire reading-journal spread using nothing but elements printed and cut on the S1. Her workflow is a fair picture of what the machine is for: pick a template, print, peel, and the first sticker was in her hand about three minutes after she found the design. For book cover stickers, she sized six large covers at 2 inches and six small ones at 1 inch, and fitted all twelve onto a single 4×7" sheet with very little left over. At $0.60 a sheet, that's five cents a sticker. The other repeat use is labels. Spice jars, storage bins, name tags, product branding for small shops. Anything that needs to look bought rather than handwritten. What holds up The one-pass workflow. This is the whole product, and it's the thing that still surprises people. Design, print, peel. The sheet never leaves the machine: it prints on one side and cuts on the other, and there's nothing to unload, re-mount or line up. The app finds the edges of your artwork automatically, so there are no manual cut lines and no cutting-pressure settings to learn. No ink to manage. Dye-sublimation means there's no cartridge to dry out or clog, and no cost difference between a full-bleed sheet and a sparse one. Colour comes from a ribbon that arrives with the paper, so paper and colour are a single purchase. Refills run $42.99 for 72 4×7" sticker sheets, about $0.60 a sheet. Two years on, that number hasn't moved. Print quality. 300 DPI dye-sublimation, a 1280-dot thermal print head, 16.7 million colours in continuous tone. The machine lays down yellow, magenta and cyan in separate passes and finishes with the laminate, which is why prints come out without a dot pattern or banding. Reviewers who print photos on it describe results closer to a lab print than a home printer. The laminate. A four-layer protective coat is applied automatically as each sheet prints, leaving stickers waterproof, fade-resistant and scratch-resistant. It's the step that makes a sticker read as bought rather than homemade, and it's one you'd otherwise be doing by hand. Accuracy you can tune. Contour cuts land within ±0.5 mm, and the machine can be calibrated: it prints a reference sheet, makes test cuts, and you tell it what it produced so it can correct itself. Worth doing before your first real project. What it's built for Yellow, magenta and cyan go down separately, then the laminate. The S1 is a sticker and photo machine, and it's worth being precise about that because it's what makes the workflow as short as it is. It prints on two things: 4×7" sticker sheets and 4×6" photo paper, both glossy, both supplied by Liene with the ink cartridge included. The sticker stock is closer to a vinyl than a paper, thick enough to feel substantial but not enough to bulk out a journal page. It takes pen, too. Fineliners, ballpoints, gel pens, acrylic markers and water-based brush markers all write on it, which is what makes functional planner stickers possible. At 28.1 × 19.7 × 10.5 cm and just under 3 kg, it's small enough to leave out permanently, which matters more than it sounds. A machine that lives in a cupboard gets used at weekends. One that sits on the desk gets used when the idea arrives. If your projects run to heat-transfer vinyl, cardstock or leather, a cutting machine is the right tool and the S1 isn't trying to replace it. What it replaces is the printer, the cutter, the mat and the laminating step for anyone whose output is stickers. Design from anywhere Phone, tablet or computer. The machine takes the file either way. The Liene Photo app runs on iOS, Android, iPad, Android tablets, Windows 10 or later and macOS 12 or later. It connects over Bluetooth 5.0 and pairs with up to three devices, or over USB-C straight to a computer. The desktop version is the one to use for laying out a full sheet. Sizing elements precisely and arranging twelve of them on a 4×7" canvas is simply easier on a large screen, and the app switches between inches and millimetres if you'd rather work in metric. The phone app is the faster route when you already know what you want: photo in, background removed, printing. Both come with the same library, now more than 50,000 templates and design assets. Seasonal sticker sheets, home organisation labels, phone case and travel card designs, planner sets. You can also upload your own artwork as a single image and let the machine find the edges of each element on it, which is how most people end up working once they've got the hang of it. The verdict at 700 days The case for the PixCut S1 hasn't changed in two years. It has only been proven. One paper path. No alignment step. No ink to buy separately. Laminated output at about $0.60 a sheet. Contour cuts to ±0.5 mm. That was the promise at launch, and two years of sheets is what turned it into a track record. What has changed is the context around it. At launch, the sensible question was whether to wait. Two years later, the newest cutting machines have arrived and they're very good at cutting, they still need a printer sitting next to them. The S1 spent those two years in people's hands instead. Two years is a long time in hardware, and most of what you can learn about a machine only shows up inside that window. The PixCut S1 got to the idea first, and it's the only one in this category with two years of real sheets behind it. Frequently Asked Questions Is the Liene PixCut S1 worth it? If you make stickers regularly, yes. It's the only consumer machine that prints, laminates and cuts in one pass, sticker sheets work out around $0.60 each with no separate ink to buy, and a well-packed sheet brings the cost per sticker down to a few cents. How much does a PixCut S1 sticker cost to make? Refills are $42.99 for 72 4×7" sticker sheets, about $0.60 a sheet. How that divides depends on how you fill the page: twelve stickers to a sheet works out around five cents each. Because it's dye-sublimation, a full-colour sheet costs exactly the same as a mostly-empty one. Does the PixCut S1 work with a computer? Yes. The Liene Photo app runs on Windows 10 or later and macOS 12 or later, as well as iOS, Android, iPad and Android tablets. It connects over Bluetooth 5.0 or USB-C. The desktop version is the better choice when you're laying out a full sheet. Are PixCut S1 stickers waterproof? Yes. A four-layer protective laminate is applied automatically as each sheet prints, leaving stickers waterproof, fade-resistant and scratch-resistant straight out of the machine. Can you write on PixCut S1 sticker paper? Yes. The glossy sticker stock takes fineliners, ballpoints, gel pens, acrylic markers and water-based brush markers, so functional planner and journal stickers work as well as decorative ones. Give ink a moment to dry. Is there anything else like the PixCut S1? Not currently. Cutting machines from Cricut, Silhouette and Brother all require a separate printer, and mini photo printers like the Canon IVY or Kodak Step print sticky-backed sheets but can't cut a contour. As of 2026, the PixCut S1 family is the all-in-one option in this category, and the only one with two years of user feedback behind it. Ready to make it three steps? See the Liene PixCut S1, read how it compares to a printer plus a cutting machine, or browse 20 things people are making with theirs.

8 Creative Sticker Ideas to Elevate Your Wedding Invitations

Want your wedding invitations to stand out the moment they land in your guests’ hands? The right details can turn a simple card into something they remember long after the big day. Stickers are a simple yet powerful way to add personality, elegance, and charm while keeping costs low. They can highlight your wedding theme, showcase your style, and even double as keepsakes. In this guide, you will find eight creative sticker ideas that can instantly elevate your invitations and set the perfect tone for your celebration. 1. Monogram Seals for Envelopes If you want your invitations to feel instantly special, add a monogram seal with your initials or wedding date. Imagine your guests holding an envelope topped with a glossy gold or silver seal that catches the light. It gives a formal, polished look and sets the tone for an elegant celebration. 2. Custom Photo Stickers of the Couple Give your guests a sticker they will want to keep by using one of your favorite engagement photos or a candid shot of you together. When they open the envelope and see your smiling faces, it feels personal and warm. It is a small touch that makes the invitation feel more like a keepsake than just an announcement. 3. Watercolor Floral Border Stickers Want your invitations to feel like a little piece of art? Watercolor floral border stickers can do just that. Pick blooms in the same shades as your wedding colors so everything feels perfectly coordinated. The soft, painted look adds a romantic, handmade touch that instantly warms up even the simplest card, making it feel thoughtful and unforgettable. 4. Save-the-Date Calendar Stickers Imagine your guests opening your invitation and finding a little calendar sticker with your wedding date circled. Fun, right? These stickers are not only cute but also incredibly practical, especially if you are planning a destination wedding and want to make sure no one forgets to book time off. Guests can pop them straight onto their calendar or planner, so your big day is locked in and impossible to miss. 5. Venue Illustration Stickers Have a wedding venue you absolutely love? Share the excitement with your guests by turning it into a beautiful illustration sticker. Picture their reaction when they see a charming sketch or watercolor of the place where you’ll say “I do.” It’s a little sneak peek that builds anticipation and makes the invitation feel even more personal. Some guests might even keep the sticker as a keepsake, especially if the venue has special meaning. 6. Mini Thank-You Message Stickers Imagine your guests opening an RSVP envelope and spotting a little sticker that says “Can’t wait to celebrate with you” or “Thanks for being part of our day.” Feels warm, doesn’t it? These mini thank-you stickers might be small, but they create an instant connection. Whether you pop them on RSVP envelopes, favor bags, or even wine bottles, it’s an easy way to share a heartfelt message before the wedding day even begins. 7. Themed Icons or Motif Stickers What little symbols tell your love story? Maybe it’s classic hearts and rings, delicate flowers from your bouquet, or cultural symbols that mean something to you both. Turn those details into small motif stickers and play around with them on your invitations. You can layer them with other stickers, tuck them into the corners, or use them as tiny accents that guests discover when they take a closer look. It’s like adding secret touches that make your invites feel even more personal. 8. Personalized Wax Seal Effect Stickers Love the old-world elegance of wax seals but not the mess or time it takes to make them? Wax seal effect stickers give you that vintage charm in a clean, ready-to-use format. Imagine your initials or wedding date embossed in gold or deep red, looking just like the real thing. You can peel and place them in seconds, which means you can dress up every invitation without spending hours melting wax. Guests will see the detail and instantly feel the thought you put into every piece. How to Make Wedding Stickers with PixCut S1 Making your own wedding stickers is not only fun but also incredibly cost-effective. Instead of ordering from a print shop, you can invest in your own PixCut S1 machine and create unlimited designs at home. This means faster turnaround, lower per-sticker costs, and total control over every design detail. Step 1: Choose or Create Your Design Open the PixCut app and select from wedding-themed templates, or upload your own custom design. Add names, dates, and decorative icons to personalize your stickers. Step 2: Prepare Your Sticker Paper Use Liene 4x7 sticker paper for the best quality. Load it into the printer, making sure it’s aligned for accurate cutting. Step 3: Print & Cut Automatically Tap “Print & Cut” in the app. The PixCut S1 will print using high-quality dye-sublimation and then cut your stickers with precision — no manual trimming required. Step 4: Peel & Apply Carefully peel off your finished stickers and apply them to invitations, envelopes, gift bags, table décor, or wedding favors. Want to see exactly how it works? Check out the PixCut S1 Quick Start Guide video for a step-by-step visual tutorial. Conclusion Wedding invitations set the tone for your big day, and the right stickers can instantly make them more memorable, elegant, or playful. By creating your own, you have full control over every detail, from design and colors to shapes and finishes, while keeping costs down. With the right tools, you can turn your ideas into beautiful, high-quality stickers that reflect your personality and wedding style. Now is the perfect time to put these ideas into action and start designing wedding stickers that your guests will love and remember. FAQs What types of stickers work best for wedding invitations? Glossy stickers are ideal for wedding invitations because they give colors a vibrant, polished look and feel smooth to the touch. Popular designs include monogram seals, floral borders, and elegant motifs that match your wedding theme. Using kiss-cut stickers also makes them easy to peel and apply neatly. How much does it cost to make wedding stickers at home? The cost depends on your materials and printer. With your own machine, you only pay for glossy sticker paper and ink refills, which can make each sticker cost just a few cents when produced in bulk. This is far more affordable than ordering from a print shop, especially if you need multiple designs. Can I design wedding stickers without graphic design experience? Yes. Beginner-friendly tools like Canva offer wedding templates you can quickly customize with your names, dates, and colors. The PixCut app also has ready-to-use templates, letting you create professional-looking designs in minutes without needing advanced skills.

Step-by-Step Guide: Create DIY Gift Tags with Liene PixCut S1 Sticker Maker

Have you ever noticed that people like a product in nice or premium packaging way more than the same product in the same old brown cover? A study shows that nice packaging can actually make people think something's worth way more – like up to 45% more! That's crazy, right? Even little things like a personalized gift tag can totally change the perceived value of an item. And instead of grabbing those boring ones from the store, why not just make your own exactly how you want them? DIY gift tags don't just look way better – they make everything feel so much more intentional. They make each present feel special, you'll save money in the long run (always nice), and they actually show off your personality. Whether it's birthdays, holidays, or you're trying to make your products look amazing, custom tags just hit different. Here's how to design, print, and cut your own gift tags using the Liene PixCut S1. You just need a couple things and some creativity, and you can make tags that look like they came from some fancy boutique but feel way more thoughtful than anything you could buy. Benefits of Making Your Own Gift Tags Making your own gift tags isn't just something to keep your hands busy—it's actually a really smart way to make your packaging look intentional and polished. Whether you're wrapping something for someone you love or getting orders ready for your business, custom tags just make everything feel more special. Here's why I'm convinced making your own is totally worth it: They feel more personal: A handwritten note or someone's name on a custom tag just hits different. It's like saying "I actually put thought into this" without having to say it. You get to control everything: The design, colors, what it says, the whole vibe, you can match whatever theme you're going for or really show off your creativity. They are cheaper: Those fancy gift tags from stores or getting them printed somewhere can be expensive. Making your own with something like the PixCut S1 ends up saving you money, especially if you do this regularly. If you've got a small business, branded tags are honestly like having a tiny billboard on every package. Slap your logo on there, maybe a QR code, or a little note that makes people want to come back. People notice when you put in that extra effort, and tags are such an easy way to do it. The really nice part? With the Liene PixCut S1, you don't need to be some design genius or have a bunch of fancy equipment. It's quick, clean, and you get results that look way more expensive than they were to make. What You’ll Need to Get Started Okay, so before we actually start making anything, you'll want to grab your stuff first. The cool thing is, you don't need much to make really nice DIY gift tags – just a handful of things. Here's what you need: Your Liene PixCut S1: This little guy does both the printing and cutting for you. Sticker or photo paper: Pick whatever PixCut S1 material makes sense for what you're doing. Like 4x7" glossy sticker paper if you want them to actually stick to things, or 4x6" photo paper if you just want to tie them on with string. Something to print: Either make a design in the Liene App, or you can also import a design from platforms such as Canva. The Liene App: You'll need this on your phone to design stuff, arrange everything, and tell the machine what to do. If you want to go an extra mile, you might also grab the following: Some twine, ribbon, or little decorations to jazz things up A hole punch if you need somewhere to thread the string through Having everything ready just makes the whole thing go way smoother. The PixCut S1 does most of the work anyway, so once your design and paper are sorted, the rest is pretty straightforward. Step-by-Step Guide to Making DIY Gift Tags with PixCut S1 Making your own tags with the PixCut S1 is honestly pretty simple. Here's how to do it: Step 1: Choose or Create Your Design Jump into the Liene App and either grab one of their templates or start from scratch. Throw in some text, shapes, little icons, whatever you want. Already made something in Canva? Just upload it straight into the app. Tips: Go with bold fonts so people can actually read the names or messages. Keep your designs around 2"–3" – that's the sweet spot for gift tags. Little touches like dotted borders or tiny icons make everything look way cuter. Step 2: Load Your Sticker Paper Slide your tag paper or sticker sheet into the PixCut S1 tray. Make sure it's lined up right so you don't end up with crooked or faulty prints. Pick your paper type in the app if it asks. Step 3: Print at 300dpi Set it to 300dpi for really nice colors and sharp details. It's really important if you've got small text or detailed designs. This setting just makes everything look way more professional. Step 4: Let PixCut S1 Do Its Thing After it prints, the PixCut S1 scans your design and starts cutting with that smart AI feature. Rectangle, circle, unique custom shape – doesn't matter, it cuts exactly where it should without you having to do anything. Step 5: Peel and Stick (or Mount on Cardstock) Once they're cut, you can either peel and stick them right onto your gifts, or stick them onto some colored cardstock to make them sturdier and more interesting. Want to tie them on? Just punch a hole for string or ribbon. Step 6: Make Them Even Better This is where you can get creative – add some handwriting, maybe a little glitter, tiny stickers, or stamp something on there. These little extras can go a long way. Creative Gift Tag Ideas to Try Need some inspiration? Here are some fun gift tag styles that work really well with the Liene PixCut S1: Birthday Name Tags: Go crazy with bright colors, fun fonts, and little icons like balloons or birthday cake. Put each person's name and maybe their age on there – kids especially love seeing their name on things. Simple Holiday Tags: Keep it clean with little snowflakes or leaves and short phrases like "Joy" or "Warm Wishes." You could even throw in a QR code that links to a holiday video or message if you're feeling fancy. Thank-You Tags for Your Stuff: Perfect if you're selling handmade jewelry, or any other product. Throw your logo on there, write something like "Thanks for the purchase" and add your Instagram so they can see what else you're up to. Baby Shower or Wedding Tags: Just match the party vibes – maybe those soft dusty rose colors everyone's obsessed with, or sage green if they're going earthy. Write something sweet like "Made with love" or "Can't wait to meet you, little one." Business Tags: Stick to your brand's aesthetic. Maybe toss in a discount code or just your website. People actually use those discount codes way more than you'd think. It's a sneaky way to get people to come back and buy more stuff. You can make all of these in different shapes with the PixCut S1. Try layered tags or go with Liene’s glossy sticker paper for a polished, professional look. If you don't have time to design from scratch, you can also design stickers fast with free templates to save time and effort. These little touches turn boring wrapping or packaging into something that actually feels special and thoughtful. Why PixCut S1 Is Perfect for DIY Tag Projects When it comes to creating high-quality DIY gift tags, not all tools are made equal. The Liene PixCut S1 is designed for simplicity, creativity, and precision—making it ideal for beginners, hobbyists, and small business owners alike. Here’s why it stands out: 300dpi high-resolution printing ensures sharp, colorful designs that look store-bought. AI-powered cutting delivers precise shapes, whether you want classic rectangles or unique custom styles. Wireless app control means you can design, print, and cut directly from your phone or tablet. Material compatibility includes Liene’s official glossy sticker paper, giving your tags a professional look. Quiet and compact design fits easily into any workspace, whether you're crafting from home or running a small shop. PixCut S1 simplifies the full process, from app design to cutting, so you can focus on creativity, not setup. It’s especially helpful for small business owners who want to add a professional touch to packaging without outsourcing. What makes it even better is its ability to support various Kiss-Cut shapes—rounded corners, simple custom outlines, or small stickers are all achievable with minimal effort. If gift tags are something you’ll use regularly—at holidays, craft fairs, or for customer orders—PixCut S1 is a powerful, affordable tool to have in your creative corner. Conclusion DIY gift tags are more than decoration. They add a thoughtful, personal touch to any gift or product. Whether it’s for a birthday, an order, or a holiday, custom tags show you care. With the Liene PixCut S1, creating tags is quick, polished, and entirely app-controlled. Just design, print at 300dpi, and let the machine cut perfect shapes with AI precision. You can also use it to create a personalized photo album, complete with captions, dates, or custom stickers. Ready to start? Add style to every package or project—make your own tags today with PixCut S1. FAQs 1.What paper should I use for sticker gift tags? Use Liene’s official 4×7″ glossy sticker paper, which is specially designed for the PixCut S1 to ensure the best printing and cutting quality. Third-party papers are not compatible and may cause issues with printing or cutting. 2.Can PixCut S1 cut gift tags into different shapes? Yes! The AI-powered cutting function allows for a variety of tag shapes—circles, rounded rectangles, and even custom outlines. 3.Do I need any design experience to use PixCut S1? Not at all. The Liene App includes beginner-friendly templates, drag-and-drop tools, and wireless control for easy design and printing. 4.Can I make tags for my small business packaging? Absolutely. Many small businesses use PixCut S1 to print and cut branded tags for product packaging, customer gifts, and thank-you notes. 5.Are PixCut S1 gift tags peel-and-stick? If you're using sticker paper, yes! The tags are peel-and-stick, making them easy to apply to boxes, bags, or cards.  

How to Label Your Homemade Candles with the Liene PixCut S1: A Step-by-Step Guide

Handmade candles make beautiful gifts—but let's be honest, without a label, even the most fragrant blend can feel unfinished. A custom label tells your story, adds charm, and transforms a simple jar into something truly memorable. Labels do way more than just look pretty; they give homemade candles their personality, help people know what they're burning, and make everything look like it came from a fancy boutique. So, whether you're making special gifts for loved ones or trying to get your own candle business off the ground, thoughtful labels really make your creations shine. In this guide, we'll walk you through labeling your homemade candles from start to finish and share some fun design ideas that might just spark something. The cherry on top? You can print and cut every label right at home using the Liene PixCut S1—a neat little device that gives your DIY projects that store-bought look without leaving the house. Why Candle Labels Matter (Even for Small Batches) Even a single handmade candle deserves a great label. Beyond style, labels serve multiple functions: they help customers identify the scent, outline safety instructions, and give the product a cohesive, professional feel. For hobbyists, a label adds a thoughtful touch that makes gifts more personal and meaningful. For sellers, they’re a branding tool—conveying your style, values, and product information all in one small space. In fact, many countries and marketplaces (like Etsy or Shopify) expect specific details on candle labels, including: Scent or fragrance name Burn time or weight Warning symbols or instructions Brand name or logo Even if you’re selling in small batches or just starting out, a well-designed label can help increase trust and drive repeat sales. Imagine receiving two similar candles, one with a clear label and scent story, and another left blank. The labeled one feels more thoughtful and trustworthy. The good news? You don’t need to outsource label printing or buy bulk supplies. With tools like the PixCut S1, you can create polished, personalized labels that adhere cleanly to glass, metal, or tin containers, all from your workspace, at your own pace. Creative Candle Label Ideas to Inspire Your Design Okay, so you're thinking about candle labels, right? The style you pick says so much about your brand, whether you're going for sleek and modern or cozy and rustic. Here are some ideas I've been loving lately: Minimalist Monochrome Text: Just clean, black text on white or clear backgrounds. Perfect for luxury, spa, or organic brands that want that effortless, classy look. Seasonal Themes: Go with what feels right for the season. Autumn leaves for cozy fall scents, snowflakes for winter vibes, pretty florals for spring and summer blends. Handwritten or Script Fonts: Hand-drawn or flowing script fonts just scream "crafted with love." Great for gifts or that homey, rustic feeling. Geometric Patterns: Simple lines and shapes make your candles look current and put-together without being too busy. The Liene PixCut S1 handles all these ideas really well. The smart cutting gives you clean, custom shapes, and you can either mess around in the Liene App or upload whatever you've already made. You're in control of how everything turns out. Beyond candles, these same techniques can be applied to other projects—using labels to maximize home organization, decorate gift packaging, or add branding to jars and containers around the house. What You’ll Need to Get Started Making nice-looking candle labels at home isn't complicated. You just need to grab a few things: Essentials: Liene PixCut S1: This little machine handles both printing and cutting your labels. Candle-safe containers: Good old glass jars, metal tins, or whatever unique containers you can find. Label artwork or a template: Make something in the Liene App or use whatever design program you already know. The Liene App: Download it on your phone to control everything from printing to cutting. Optional Extras: Heat-resistant label material: Consider this option if your candles tend to get quite warm. Twine, ribbon, or belly bands: Fun little touches that make everything feel more handmade. Kraft paper wraps or gift boxes: Great for when you want the whole package to look cohesive. How to Label Your Candles Using Liene PixCut S1: Step-by-Step Whether it's your very first label or you've done this a bunch of times, here's how to get your candles looking really good. Step 1: Pick Your Container & Give it a Quick Clean Grab the jar or tin you're using for your candle. Just wipe it down with a dry cloth or an alcohol wipe to get rid of any dust or fingerprints. A clean surface means labels that actually stay put. Step 2: Design Your Label in the Liene App Jump into the Liene App to make your label. You can: Upload your own artwork Add text like the scent name, your logo, or those safety warnings Pick exactly what shape and size you want. Already made something in Canva or Illustrator? No worries—just save your file and bring it into the Liene App. Step 3: Print at 300dpi Using PixCut S1 Load the official Liene 4x7'' PET sticker paper into the PixCut S1. In the app, make sure you select 300dpi so everything looks sharp. Quick check that your design fits your container before you print. Step 4: Let the AI-Guided Tool Cut Your Label After it prints, just turn on the PixCut S1's cutting mode. The smart cutting system performs precise kiss-cutting, leaving the backing sheet intact while shaping your labels accurately—even with custom curved designs. Step 5: Apply Your Label Carefully & Evenly Peel the label off its backing and press it onto the container, starting from the middle and working outward. Use a clean cloth to smooth out any air bubbles that pop up. pro Tip: For curved jars, smaller labels or ones with rounded edges usually work way better. Step 6: Add Those Final Decorative Touches! Want to make it even nicer? Tie some twine or ribbon around the lid. Throw on a little hang tag or write a quick thank-you note if you're giving it as a gift or selling it. Belly bands or small stickers can make everything look more put-together too. And there you have it! A candle that looks like it came from a fancy shop, all made right from your own space. Top Reasons to Use PixCut S1 for Homemade Candle Labels Why choose the Liene PixCut S1 over any other label maker for candle jars? Here’s what makes it a standout tool for candle crafters: 300dpi Printing Resolution Delivers clean, high-resolution results ideal for intricate designs and tiny text. AI-Powered Cutting Forget scissors or die cuts. The PixCut S1 cuts any shape with precision, whether it's a square, a circle, or a custom design. Wireless Control with the Liene App Use your phone or tablet to handle everything—no need for separate software. Material Compatibility Supports Liene’s official 4x7'' PET sticker paper, which is optimized for high-quality printing and precise kiss-cutting. Compact & Beginner-Friendly No steep learning curve. Setup is fast, and results are reliable, even for first-time users. For small-batch sellers or gifting enthusiasts, this tool streamlines the process while letting your creativity shine. It’s like having a mini print shop at home. Conclusion You don’t need industrial printers or expensive design services to make candles that look store-ready. With just a bit of creativity and the PixCut S1, even small batches can achieve a high-end feel. This compact machine brings pro-level precision into your home studio, making label design fast, fun, and customizable. Whether you're crafting gifts for loved ones or launching your candle line, the right label sets the tone for your brand. And since PixCut S1 also lets you print photos at home, it’s a versatile tool for both crafting and memory-making. Start simple or explore bold designs—with PixCut S1, the possibilities are endless. Start crafting your own candle labels today—explore the Liene PixCut S1 now. FAQs 1.Do I need special paper for candle labels? The PixCut S1 is designed to work exclusively with Liene’s official 4x6-inch photo paper and 4x7-inch PET sticker paper, which are specifically optimized for high-quality thermal dye-sublimation printing and precise kiss-cutting. Currently, only the white glossy PET sticker paper is available, while transparent and metallic finishes are expected to launch in about 6 months. 2.Can I make cool shapes like circles or fancy curves? Totally! The PixCut S1's smart cutting lets you do circles, arches, or whatever weird shape you dream up. Way more fun than boring rectangles, and it makes your candles look way more custom. 3.Why do my labels keep peeling off my round jars? Make sure your jar is actually clean first – no dust, no fingerprints. Then use labels that bend well, and go smaller or pick designs with rounded edges. They just stick better to curvy surfaces. 4.What should I actually put on my labels? The scent name for sure, your name or brand, how long it burns for, or how much it weighs, and those safety warning things. You could also throw in a QR code if you want to link to care tips or your website. 5.Is this thing hard to figure out if I've never done this before? No, it's pretty straightforward. You just download the app, connect it wirelessly, and you're good to go. Even if you've never made labels before, you can get professional-looking results in like 2 minutes.  

How to Design Stickers Fast with Free Templates Using the Liene PixCut S1

Want to create custom stickers—but don’t have the time (or tools) to design them from scratch? You’re not alone. Stickers are everywhere right now—on laptops, gift boxes, journals, and packaging, and everyone wants in. Whether for planners, packaging, or just for fun, stickers are everywhere, but making them from a blank canvas can feel overwhelming, especially for beginners. That’s where free sticker templates come in. These ready-made layouts help you create beautiful, functional designs in minutes, no design skills required. In this guide, you’ll learn how to find, customize, and print stickers quickly using templates from popular platforms. We’ll also introduce you to the Liene PixCut S1—a compact, wireless printer and cutter that makes the entire sticker-making process fast and professional. With 300dpi high-resolution printing, AI-powered cutting, and seamless app control, PixCut S1 is the perfect match for sticker creators who want speed and style. Benefits of Using Sticker Templates Instead of Designing from Scratch Designing stickers can be fun, but it’s not always fast. Free templates are a game changer for anyone short on time, new to design, or just wanting polished results with minimal effort. With templates, you can go from concept to cut in under 30 minutes, making them ideal for planners, packaging, gifts, and more. Here’s why templates are the way to go: Speed: Templates in the Liene App are pre-designed and perfectly sized for PixCut S1. There’s no need to adjust dimensions—just add your text or images and get ready to print and cut. Precision: Templates in the Liene App are often built to fit standard sticker sizes, which makes them a perfect match for cutters like the PixCut S1. Beginner-Friendly: No fancy design skills? No problem! With Canva and the Liene App, just drag, drop, tweak, and boom, you’ve got a custom sticker. Where to Find Free Sticker Templates There’s no shortage of free sticker templates online—you just need to know where to look. Below are three great places to start, each with its own strengths depending on your style and project. Whether you're creating planner layouts, labels, or want to make your own scrapbook stickers, these platforms have you covered: Liene App Designed to work seamlessly with the PixCut S1, the Liene App offers simple, functional templates you can use right away. They’re pre-sized for perfect print-and-cut alignment and ideal for small projects, gift tags, or personal labels. Canva If you’re into social-themed designs, soft colors, or playful fonts, Canva is a fantastic choice. With thousands of free layouts for labels, name tags, and branding stickers, Canva makes it easy to personalize any design, even if you’re brand new to it. Creative Fabrica For planner lovers and crafters, Creative Fabrica is a treasure trove. You’ll find seasonal bundles, icon sheets, decorative borders, and more, many of which are free with an account. These templates are especially great for mood trackers, journaling stickers, or event planning. Pro Tip: When searching for templates, use terms like “free planner sticker templates”, “aesthetic label template”, or “Canva sticker sheet” to find layouts that match your vision and purpose. How to Customize, Print, and Cut Stickers with the Liene PixCut S1 Using free templates with your Liene PixCut S1 is pretty straightforward! With just a few steps, you can go from a downloaded file to ready-to-peel stickers, no fancy equipment or design degree needed. Here's how it works: Step 1: Pick Your Template Download a template from places like Canva or Creative Fabrica, or grab one from the Liene App. Just make sure it matches what you're making. Step 2: Import or Edit in the Liene App Downloaded from somewhere else? No problem—upload it as an image or PDF. You can move it around, resize it, or tweak the cut lines in the app. Step 3: Customize Your Design This is the fun part: add your own text, quotes, icons, or whatever you want. Change colors and fonts until they look right. Birthday labels, business stickers, random stuff—whatever you need! Step 4: Load Your Sticker Paper Insert Liene’s official 4×7″ sticker paper — available in white, transparent, or metallic finishes — for the best results. Align the paper properly in the PixCut S1 following the app’s on-screen instructions. Step 5: Print at 300dpi Hit 300dpi in the app settings for crisp prints. Trust me on this one—especially if you've got small text or detailed stuff. Step 6: Cut with PixCut S1’s AI-Powered System Turn on auto-cut and watch the PixCut S1 figure out your design's edges and cut around them. Circles, weird shapes, whatever—it handles it. Step 7: Peel and Stick Done! Peel them off and stick them wherever—notebooks, packages, your laptop, whatever needs a personal touch. Quick idea: These work great for labeling homemade stuff like candles, tracking habits in journals, or making event invites look less generic. Who Can Benefit from Using Free Sticker Templates? Sticker templates aren't just for arts and crafts anymore—they're lifesavers for all kinds of people who need stuff done yesterday. Here's who gets the most out of them: Teachers: Need reward stickers for that kid who finally turned in homework? Or subject labels that don't look like you made them at 11 PM? Free sticker templates have your back. Etsy Sellers & Small Business Owners: Stop spending hours designing thank-you stickers. Grab a template, add your logo, and boom—your packages look professional without the designer price tag. Planner Enthusiasts & Bullet Journalers: We know you love your spreads, but who has time to design mood trackers from scratch every month? Templates keep your layouts looking good without the stress. Parents & Kids: Name labels for school stuff, chore charts that might actually motivate the kids, or just fun shapes for rainy-day crafting. Free templates make parents' lives a little easier. Event Organizers: Wedding favors, birthday party bags, baby shower labels—templates help you pull together cohesive details without hiring a designer or losing your mind. Students: Free Sticker templates allow you to personalize your laptop without spending a fortune on fancy sticker designs that cost more than your textbooks. Crafters & Hobbyists: Try new styles and seasonal themes without starting from a blank page every single time. Tidy Up Your Stickers: Storage Solutions Let's be real—once you start making stickers with your PixCut S1, they multiply fast. One day, you're making a few labels, next thing you know, you've got sticker sheets everywhere and can't find the one you actually need. Here's how to keep your sticker collection under control without going overboard. For finished stickers, clear binder sleeves work great—you can flip through them like a catalog, and everything stays protected. Small tackle boxes or drawer organizers are perfect for individual stickers sorted by theme or project. Don't forget your supplies either. Keep your Liene sticker paper flat in a drawer or folder, and give your PixCut S1 a dedicated spot on your desk or craft area. Create project bins so all your materials for one design stay together. The key is simple systems that actually work for how you create. No fancy organization required—just enough structure, so you're not digging through chaos every time you want to make something. Conclusion With free sticker templates and the Liene PixCut S1, creating professional-quality stickers at home is easier than ever. This all-in-one device combines high-resolution printing, built-in lamination, and AI-powered precision cutting, making the process fast and beginner-friendly. Whether you’re customizing planners, decorating gifts, or designing labels for a small business, the PixCut S1 and its user-friendly app help you turn ideas into vibrant, durable stickers — all from the comfort of home. FAQs 1.Can I use templates from other platforms with the Liene App? Yes. You can upload templates from Canva, Creative Fabrica, or other design tools into the Liene App as images. 2.Do I need design experience to use sticker templates? Not at all! Templates are beginner-friendly. Just edit the text, colors, or layout, and you're good to go. 3.What types of sticker paper work with PixCut S1? PixCut S1 only supports Liene-branded 4×7″ sticker paper, available in white, transparent, and metallic finishes. For best results, use the official Liene materials—third-party paper is not compatible. 4.Can PixCut S1 cut around custom shapes or outlines? Yes! It uses AI to detect edges and cut any shape—circles, hearts, arches, or full custom outlines. 5.Is the Liene App free to use with PixCut S1? Yes, the Liene App is free to download and use. It connects wirelessly to your PixCut S1 and handles design, printing, and cutting.  

Where to Use Your Stickers: 20 Creative Ideas for Everyday Life with the Liene PixCut S1

Stickers aren't just for scrapbooks or kids' toys anymore. Seriously, these days, they're everywhere—jazzing up laptops, making boring storage bins actually useful, and turning plain packages into something you're excited to receive. Whether you're sprucing up a laptop, adding a special touch to packaging, or just neatly labeling your spice jars, stickers make everything look more intentional and put-together. The good news? With the Liene PixCut S1, making your own custom stickers at home is easier than ever. From printing vibrant designs to precise AI-powered cutting, PixCut S1 allows creators to produce professional-quality stickers that seamlessly integrate into daily routines, hobbies, and businesses, without the hassle of complicated tools or steep learning curves. So, if you're wondering what to do with all those awesome sticker ideas, here are 20 ways to use them right now. Benefits of Using Stickers in Everyday Life Here's the thing about stickers—they just solve problems without you even thinking about it. Can't remember what's in that mystery container? Slap a label on it. Kids acting up? Break out the star stickers. Need to make your boring work laptop look like it actually belongs to you? Stickers to the rescue. For small businesses, stickers support branding—sealing packages, adding thank-you notes, or labeling products. Their low cost and versatility make them a powerful tool for marketing and packaging. Even on the go, stickers add function to fun. They mark dates in planners, decorate items for easy identification, or turn plain notebooks into something expressive. From labeling to self-expression, stickers bring clarity and creativity to daily life. 20 Creative Places to Use Stickers in Real Life Water Bottles & Tumblers: Make your drinkware uniquely yours, perfect for school, the gym, or the office. Laptops & Tablets: Let your tech reflect your personality or brand, whether you're working, travelling, or hanging out with friends. Phone Cases: A sticker adds flair to your phone, letting your personality shine through it. Notebooks & Journals: Decorate your notebooks and journals with stickers, making their covers and pages truly inspiring, creative, and thematic. Planner & Calendar Pages: Use stickers to mark important dates, highlight tasks, or add custom labels. Never forgetting another important day. Gift Tags & Wrapping: You could add names, heartfelt messages, or fun visuals to presents and gifts with custom stickers. Thank You Notes or Cards: A personal sticker makes any note feel more heartfelt, stylish, and unforgettable. Kids’ Lunchboxes: Brighten up the kids' lunchtime. Personalize their lunchboxes with favorite characters, names, or cute motifs. School Supplies: Personalize pencils, folders, or binders with fun labels and decorations, and you can say goodbye to mix-ups. Kitchen Jars & Labels: Transform your pantry by labeling your staples, from flour to coffee beans, for a harmonious, uniform, and practical look. Spice Bottles: Quickly spot your go-to spice blends. Labels help you grab the right seasoning every time. Mailing Envelopes: Whether it's your business logo or just something fun, custom stickers make your packages way more memorable than plain brown boxes. Party Favors: You know how some party favors feel cheap and rushed? Custom stickers instantly make everything look more thoughtful and special. Product Packaging: With branded packaging, sealing stickers, or thank-you seals, you can turn one-time buyers into repeat customers who remember you. Candle or Jar Labels: Whether you're making candles for friends or starting an Etsy shop, the right labels make your creations look like they belong on store shelves. Wall Decor: Create vibrant themed sticker murals, fun kids’ room accents, or effortless seasonal decor on your walls. Storage Bins & Containers: Life's too short to dig through mystery boxes. Clear labels Maximize home organization and save you time and frustration. Car Bumper or Window Stickers: Show off your favorite slogans, logos, causes, or family pride wherever you drive! Plant Pot & Tray Labels: Label your herb garden, houseplants, or seed starting trays so you actually remember what you planted where. Sticker Packs to Sell or Gift: Custom sticker packs make great gifts, and people love collecting unique designs they can't get anywhere else. So, no matter the surface, shape, or purpose, stickers truly have a place—and with PixCut S1, bringing them to life with a professional touch is easier than ever. Your Step-by-Step Guide: Creating Stickers with PixCut S1 Creating your own stickers at home with the Liene PixCut S1 is not just easy—it’s fun, fast, and surprisingly professional. Whether you’re making labels for your kitchen jars or designing a pack of stickers to sell, the whole process is beginner-friendly and streamlined from start to finish. Here’s a quick guide to walk you through the creation process: Step 1: Choose or Design Your Artwork Open the Liene App, which connects directly to PixCut S1. Upload your own artwork or browse through templates, clip art, and editable designs. You can customize text, colors, and layout—perfect for creating something personal, practical, or branded. Step 2: Print on Liene Sticker Paper Insert the official 4×7'' Liene sticker paper into your PixCut S1—it's optimized for waterproof, fade-resistant results. Step 3: Cut with AI Precision Once it's printed, the PixCut S1's AI-powered sensors get to work, detecting outlines and cutting your design with incredible accuracy. Whether it's a simple circle, a custom shape, or a super detailed contour, there's no manual setup required. Step 4: Peel, Apply, and Enjoy Now, just peel off your finished sticker and stick it anywhere you like—on plastic, glass, metal, or paper! The adhesive is strong enough to stay put, but often gentle enough for a quick reposition if you need to adjust it. With just four simple steps—design, print, cut, and peel—you’ll have custom stickers ready to use, gift, or sell. Why Choose the Liene PixCut S1 for Stickers Here's the deal with the Liene PixCut S1—it's basically everything you wish other crafting machines were but aren't. Small enough for your kitchen counter, smart enough that you won't mess it up, and honestly? It makes stickers that look way more expensive than they are. Here's what makes it actually worth buying: 300dpi Printing: Your designs come out crisp and colorful, whether you're making simple labels or detailed artwork. No more pixelated disasters or colors that don't resemble what you designed. AI-Powered Cutting: Remember struggling with scissors, trying to cut around tiny details? Yeah, Liene PixCut S1 does it automatically and doesn't mess up. Your stickers look like you bought them, not made them. Wireless Control with Liene App: Connect it to your phone, and you're done. Upload your design, hit print, and go grab a coffee while it does its thing. Compact & Beginner-Friendly: Dorm room? Kitchen table? That tiny corner you call a craft space? It works. And if you've never made stickers before, don't worry—this thing is pretty much foolproof. Whether you’re printing a batch of planner labels or cutting branded stickers to sell, PixCut S1 keeps the process simple, accurate, and genuinely fun, turning your ideas into quality stickers you’ll be proud to use or share. Conclusion Stickers are one of the simplest yet most impactful ways to bring creativity and function into daily life. They can label, decorate, promote, and personalize—making everything from a water bottle to a small business package more exciting and eye-catching. The Liene PixCut S1 makes it simple to bring your sticker ideas to life. You don’t need advanced design skills or bulky equipment—just an idea, your phone, and the PixCut S1, and you can make professional-looking stickers that'll actually impress people. Just remember to pick the right PixCut S1 material for the job—using official Liene sticker paper ensures the best print quality, durability, and cutting precision. So why not give those ideas a physical form? Use the inspiration from the 20 everyday sticker ideas above, or come up with your own. With the Liene PixCut S1, the possibilities are endless, the setup is seamless, and the results are always impressive. FAQs 1.What type of paper should I use to make stickers with PixCut S1? Use the official 4×7″ Liene PET sticker paper for the best print quality, durability, and cutting accuracy. Third-party sticker paper or vinyl is not supported, as the PixCut S1 is optimized to work exclusively with Liene materials. 2.Can PixCut S1 cut complex sticker shapes? Yes. Thanks to its built-in AI-powered cutting, PixCut S1 can detect and cut around any shape, including detailed curves, intricate outlines, and non-standard designs. 3.Do I need transfer tape for stickers? No. Transfer tape is only required for decals or vinyl graphics, which the PixCut S1 does not support. It is designed specifically for kiss-cut stickers on official Liene sticker paper. 4.Can I sell the stickers I make with PixCut S1? Absolutely. Many small business owners use PixCut S1 to create high-quality sticker packs, labels, or branding elements for sale. Just ensure you are using the official Liene sticker paper for reliable quality and durability. 5.Is PixCut S1 beginner-friendly? Yes. PixCut S1 was designed with simplicity in mind. From the intuitive Liene App to the automatic cutting and printing process, beginners can jump in quickly with no prior experience required.

How to Pick the Right PixCut S1 Material for Your Project

Creating professional-quality stickers or prints isn’t just about the design—it starts with the right material. The Liene PixCut S1 photo sticker printer and cutter is built for speed, precision, and stunning results. But to unlock its full potential, you need to pair it with official Liene materials. The 4×7″ sticker paper and 4×6″ photo paper from Liene are specifically designed for use with the PixCut S1. Optimised for 300 dpi dye-sublimation printing, automatic lamination, and AI-assisted cutting, these materials ensure every print is clean, durable, and vivid. Whether the goal is to create custom labels, enhance planners, or produce high-resolution photos, using the correct paper guarantees waterproof, fade-resistant results that stand the test of time. In this guide, we’ll cover exactly which materials are supported, why your choice matters, and how to select the perfect one based on your creative or business project. What Materials Work with Liene PixCut S1? The PixCut S1 is designed to work exclusively with official Liene sticker and photo paper, and does not support third-party materials, ensuring flawless printing and cutting every time. These materials are carefully developed to match the printer’s thermal dye-sublimation and lamination processes, offering smooth operation and consistently high-quality output. Here are the two types supported: 4×7″ sticker paper This is the go-to material for labels, branding, and custom stickers. It features enhanced adhesive for secure sticking and supports automatic lamination for a glossy, scratch-resistant finish. Great for planners, gift tags, packaging, and more. 4×6″ photo paper Best suited for high-quality photo printing, this paper is designed for true-to-life color accuracy and rich detail. It prints at 300 dpi and delivers smooth results ideal for albums, ID photos, framed keepsakes, or personal gifts. Both paper types are optimised for the PixCut S1’s four-layer dye-sublimation technology, creating prints that are waterproof, fade-resistant, and scratch-resistant—perfect for everything from hobby crafts to small business needs. Why Choosing the Right Material Matters Using the correct material for your PixCut S1 isn't just about print quality—it’s essential for proper function, long-term durability, and overall ease of use. Every part of the PixCut S1, from its thermal dye-sublimation printer to its AI-powered cutting system, is fine-tuned to work with Liene-branded stickers and photo paper. These materials are engineered for smooth feeding, accurate detection, and high-resolution output. By contrast, generic printer paper or non-Liene sticker sheets may seem like cost-effective alternatives, but they introduce major risks. They aren't designed to withstand the high heat of sublimation, may lack the proper coating for color retention, and can easily misalign during cutting. Here’s what can go wrong with the wrong materials: Sticker peeling due to low-quality or incompatible adhesive Ink smudging or bleeding with paper not built for thermal printing Cutting misalignment from paper sizes or edges not recognized by the AI Faded prints or warping over time due to missing UV or lamination layers With Liene's 4-layer dye-sublimation process, each layer serves a purpose—bringing together vivid color, sharp detail, surface protection, and a polished finish. Only the official Liene materials are made to fully support this system. Whether you're making stickers to sell, organizing your space, or gifting photo prints to loved ones, using PixCut-compatible paper ensures everything looks clean, sticks properly, and lasts. It’s the small detail that makes a big difference in the final result. How to Pick the Right Material Based on Your Project Choosing between sticker paper and photo paper depends on the purpose of your project. Here’s a quick breakdown of which material to use based on your creative or business goals: Labels & Organization Use: 4×7″ Sticker Paper If you're making custom labels for spice jars, pantry bins, school supplies, or storage containers, this is your best bet. Liene’s enhanced-adhesion sticker paper sticks securely on smooth surfaces and resists moisture, making it ideal for kitchens, bathrooms, and kids’ gear. Finish Tips: Let the sticker go through the lamination process to make it glossy, waterproof, and scratch-resistant. Great for both personal use and selling handmade goods. 2.Stickers & Crafts Use: 4×7″ Sticker Paper Planning to create planner stickers, scrapbooking accessories, or branding tags? The PixCut S1’s sticker paper handles small cuts with ease. Whether you go for die-cut shapes or simple kiss-cut sticker sheets, the app allows precise cuts with minimal effort. Finish Options: Glossy finish – Let the lamination complete for a professional polish. Common Use Cases: Etsy shop orders Event favors and gift tags Business promo stickers 3. Photos & Personalized Gifts Use: 4×6″ Photo Paper Showcase your cherished memories with Liene’s 4×6″ photo paper—perfect for everything from family snapshots to passport photos. Designed for vibrant colors and crisp detail, it delivers quality that rivals lab-developed prints, making it ideal for albums, gifts, and more. Ideal for: Albums and collages Framed gifts School or ID cards Holiday prints or greeting cards Pro Tip: Let the ink dry completely before handling or framing to avoid smudges or distortions. By matching the material to your project, you’ll not only get the best look but also ensure long-lasting durability. Don’t forget to check the in-app settings to select the right paper size and cut mode before you start. Material Tips for Best Results with PixCut S1 To get clean, professional results every time, follow these proven tips when working with Liene’s sticker and photo paper: Run a test print and cut before committing to a batch. This helps avoid waste and lets you double-check placement, size, and clarity. Let ink dry fully before cutting. The PixCut S1 includes a built-in lamination step, but prints should still cool before handling—especially if you're removing them early for a matte finish. Store sheets flat in a cool, dry place to prevent warping or curling. Avoid humid storage or placing heavy objects on the paper. Stick to recommended paper sizes. 4×6″ and 4×7″ are the only formats the PixCut S1 can scan and cut accurately. Avoid touching the surface of glossy paper before printing to reduce fingerprints or oil spots that can affect ink transfer.  Following these small but important steps ensures clean edges, accurate cuts, and vivid prints every time. Where to Buy PixCut-Compatible Materials For the best results, always use official Liene materials sold via their store or trusted partners. The PixCut S1 supports: 4×7″ sticker paper (sold in 20–60 sheet packs) 4×6″ photo paper (available in gloss finish) Starter kits with both materials included, ideal for beginners Buying from Liene ensures you're getting media that’s been tested and calibrated for 300 dpi dye-sublimation and AI-assisted cutting. While third-party vinyl or generic inkjet sticker sheets may be tempting due to low cost, they are not supported and can lead to: Print quality issues Failed cuts Adhesive residue damaging the machine Visit liene-life.com to browse materials, get bundle discounts, and stay updated with the latest PixCut-compatible releases. Conclusion To make the most of the Liene PixCut S1, choosing the right material is just as important as the design itself. Whether you're printing waterproof labels, crafting Etsy shop stickers, or preserving cherished memories on photo paper, using Liene’s branded media ensures durability, quality, and professional results that truly stand out. Avoid the risks of third-party materials—such as poor adhesion, smudging, or misaligned cuts—and always use official Liene sticker and photo paper to streamline your workflow. The right paper not only saves time but also enhances every print and cut you create. With the right setup, printing and cutting becomes fast, fun, and frustration-free. Whether you’re a creative hobbyist or a small business owner, you’ll enjoy professional results with minimal effort. Ready to create? Visit Liene pixcut s1 material page to stock up and start bringing your ideas to life with confidence. FAQs What’s the best sticker paper for PixCut S1? The 4×7″ Liene sticker paper with enhanced adhesion and lamination support. Can I use third-party vinyl? No. Vinyl or generic sticker sheets are not supported and may damage the machine. Is the output waterproof and fade-resistant? Yes. The 4-layer dye-sublimation process ensures waterproof, smudge-proof, and UV-resistant prints. How do I avoid smudges on glossy prints? Let the lamination step finish and allow prints to cool before handling. What’s the difference between the photo and sticker paper? Photo paper (4×6″) is for image prints; sticker paper (4×7″) has adhesive backing for labeling and crafts.  

Decal vs Sticker: What’s the Real Difference? (And What You Can Make with Liene PixCut S1)

If you’ve ever browsed through a collection of designs for your water bottle, laptop, or car, you’ve likely come across both stickers and decals. The terms are often used interchangeably, but they actually refer to two different types of products, each with its own materials, application method, and purpose. While both can be decorative and expressive, they’re built for different environments and levels of durability. Understanding the difference can help you choose the right one for your needs—and better yet, make them yourself at home. With a compact, beginner-friendly tool like the Liene PixCut S1, creating stickers is quick, fun, and easy. All you need is a basic understanding of what sets these things apart to get started with confidence. What Is a Sticker? A sticker is a printed design, such as a logo, illustration, or text—applied to adhesive sticker paper. It’s essentially a peel-and-stick solution that requires no additional tools or steps to apply. Just peel off the backing, press it onto a clean surface, and you’re done in seconds. Stickers are versatile, easy to use, and perfect for quick personalization or branding. Stickers are often used for: Decorating notebooks, laptops, or water bottles Enhancing product packaging and envelopes Creating name tags, labels, and business branding Adding fun, colorful elements to planners and scrapbooks Expressing creativity and personality through art The Liene PixCut S1 makes sticker creation effortless and precise. With 300dpi high-resolution printing and AI-powered precision cutting, your sticker designs come out sharp, vibrant, and perfectly trimmed. You can design directly in the user-friendly Liene app or import custom graphics from your favorite design software. Whether you’re crafting for fun, organizing your space, or starting a small business, the PixCut S1 is a smart, compact tool that brings your sticker ideas to life with ease. Beyond everyday decoration, stickers also serve as powerful tools for storytelling and communication. Whether you're marking important dates in a planner, creating custom labels for handmade goods, or designing a sticker sheet to share your art, stickers allow you to convey ideas in a playful, visual way. With the Liene PixCut S1, bringing those ideas to life is not only simple—it’s also incredibly satisfying. You can experiment with styles, shapes, and sizes to make each sticker uniquely yours. What Is a Decal? A decal is similar to a sticker in that it features a printed or cut design with an adhesive backing, but the application process is different. Rather than simply peeling and sticking, decals are transferred onto a surface using a layer of transfer tape. This method helps keep complex designs or separated elements—like individual letters—perfectly aligned during application. It's especially useful for larger graphics or anything that needs clean, precise placement. Decals are typically made from cut vinyl, a material known for its durability and weather resistance. Once applied, decals can withstand sun, moisture, and general wear and tear, making them a great choice for long-term or outdoor use. Common surfaces where decals are used include: Car windows and bumpers Storefront windows or display glass Interior walls or home furniture Laptops, tablets, and other electronics where a seamless look is preferred Because of their resilience and polished finish, decals are often chosen for business signage, automotive branding, and custom home decor. The transfer process allows the design to appear as if it's been painted or printed directly onto the surface, with no background or border. However, the Liene PixCut S1 is designed exclusively for stickers and does not support vinyl cutting or transfer tape needed for decals. The PixCut S1 is not for heavy-duty or weatherproof decal applications. Understanding this distinction ensures you’ll get the best results from your PixCut S1—and choose the right materials for the right job. Key Differences Between Decals and Stickers Aspect Stickers Decals Application Method Peel and stick directly onto the surface. Requires transfer tape to apply the design precisely to the surface. Materials Made from adhesive sticker paper. Made from cut vinyl; uses transfer tape for placement. Durability Suitable for indoor use; may fade or peel with moisture or sun exposure. More durable and weather-resistant; ideal for outdoor or long-term use. Common Uses Perfect for laptops, notebooks, planners, scrapbooking, and packaging. Best for business signs, car graphics, window displays, and wall art. Compatibility with PixCut S1 Fully compatible; PixCut S1 prints and cuts stickers with precision. Not supported Which One Should You Use? So, how do you choose between a sticker and a decal? It all depends on what you're trying to create and where you plan to apply it. Use Stickers If You Want To: Decorate your laptop, journal, or phone case Add flair to product packaging or shipping boxes Create fun, colorful graphics for scrapbooking or labeling Showcase your cherished memories in photo albums, travel journals, or custom keepsakes Use Decals If You Want To: Add branding to a car, glass storefront, or sign Decorate your home walls or furniture with vinyl quotes or designs Apply durable designs to outdoor surfaces or rough materials You can start small with stickers and move to decals for more advanced projects. How to Create Stickers at Home with Liene PixCut S1 Whether you’re making stickers, the process is remarkably simple with the Liene PixCut S1. Here’s a quick step-by-step guide: Step 1: Design Your Artwork Use the Liene App to create your design or import artwork from your phone or computer. You can adjust colors, scale the design, and set up the cut outline right inside the app. Step 2: Print with Liene PixCut S1 Load your Liene official sticker paper into the PixCut S1 and hit print. The 300dpi resolution ensures your design is crisp, detailed, and ready for cutting. Step 3: Precision Cutting Once printed, the PixCut S1 uses AI-powered cutting to trace the exact outline of your design. This means no jagged edges, misalignment, or wasted materials. For Stickers: Simply peel and stick. Your sticker is ready to go—whether you’re labeling, decorating, or gifting. For Decals: The PixCut S1 supports sticker paper only. It does not handle vinyl materials or support transfer tape usage. Why Liene PixCut S1 Is Ideal for Stickers The Liene PixCut S1 isn’t just another printer or cutter—it’s a versatile, compact machine that combines the power of both into one stylish tool. Here’s why it stands out for home creators: High-Resolution Printing (300dpi): Prints in 300dpi high-resolution, ensuring crisp, vibrant, and detailed designs. Your artwork comes to life with rich colors and clean lines, perfect for everything from fun sticker sheets to polished branding materials. AI-Powered Precision Cutting: AI-powered precision cutting allows for perfectly outlined shapes, even for complex or intricate designs. You’ll never have to worry about jagged edges or manual trimming again. Wireless and App-Controlled Convenience: App-controlled and fully wireless, the PixCut S1 lets you design and print directly from your smartphone or tablet. No cables, no technical hassle—just creative freedom at your fingertips. Supports Multiple Materials: Supports multiple materials, including printable sticker paper. Whether you’re making peel-and-stick labels or professional stickers, the PixCut S1 handles it with ease. Compact, Stylish, and Beginner-Friendly: Compact, stylish, and beginner-friendly, it fits comfortably on a desk or craft shelf while offering powerful performance. Even if you're new to crafting, you'll be up and running in minutes. Whether you’re a small business owner, hobbyist, or first-time DIYer, the PixCut S1 makes sticker-making easy to sticker making without investing in separate devices. Conclusion Stickers are peel-and-stick designs great for fun and easy applications, while decals are transferred vinyl graphics that offer durability and a sleek finish. Knowing the difference helps you choose the right approach for your next project. With the Liene PixCut S1, you can design, print, and cut stickers right from home, with no hassle and no mess. So go ahead—get creative, stay organized, and make your ideas stick. Ready to start? Explore everything you can do with PixCut S1 at Liene. FAQs What is the difference between decals and stickers? Stickers are peel-and-stick designs printed on adhesive sticker paper. Decals are usually vinyl designs transferred using transfer tape for a clean, borderless look. Are decals more durable than stickers? Yes. Decals are typically made of weather-resistant vinyl, making them more suitable for outdoor and long-term use. Can I make stickers and decals with Liene PixCut S1? No. The PixCut S1 is built for sticker creation only. It does not support vinyl or decal production. What materials do I need to make decals? You’ll need printable vinyl sheets and transfer tape. Consider using a vinyl cutter for decal projects. Do I need transfer tape for stickers? No, transfer tape is only needed for decals. Stickers can be applied directly by peeling off the backing and sticking them to your desired surface.

3 / 8